

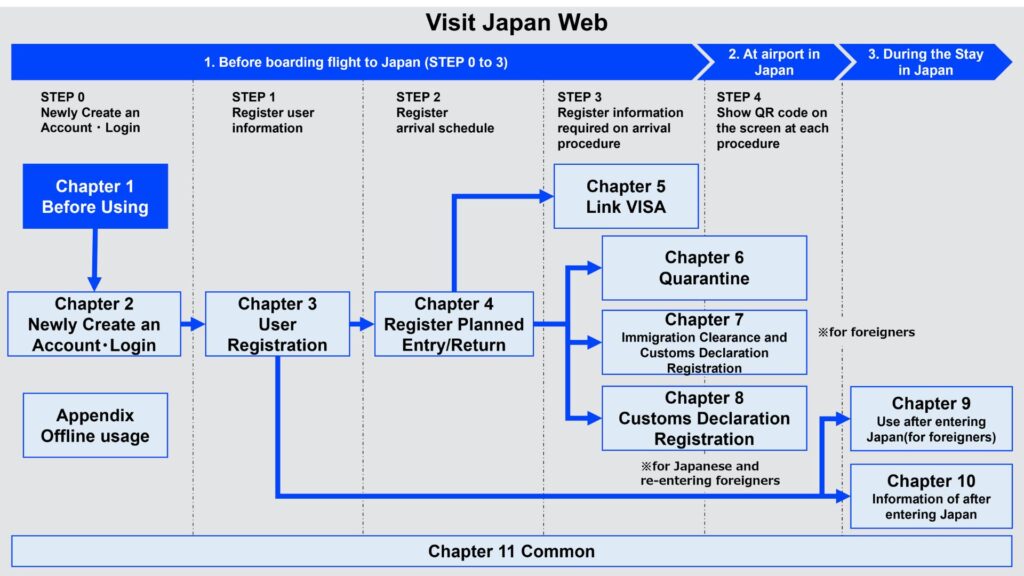
Visit Japan Web, the official platform created by the Digital Agency of the Government of Japan, will help you plan your trip to Japan, arriving quickly and without tension. Handle your entry procedures, health declarations, and more in one convenient location with this user-friendly platform.
Visit Japan Web defines what it is
Imagine skipping airport lines and breezing through immigration without the hassle of paper forms. That’s exactly what Visit Japan Web offers. It’s an official online service launched by the Japanese government that lets travelers complete immigration procedures, customs declarations, and even tax-free shopping registration before arrival.
Since April 2023, Japan has removed the requirement for COVID-19 vaccination or negative test proof when using the platform. Still, travelers must complete the digital forms before flying. Visit Japan Web supports multiple languages and is accepted at all major Japanese airports—including Narita, Haneda, Kansai, and Fukuoka.
In short, Visit Japan Web simplifies entry into Japan by merging several steps into one smooth, time-saving digital process. It’s the smart way to start your journey.
How to Use Visit Japan Web

Traveling to Japan? The Visit Japan Web makes the arrival process faster, smoother, and paper-free. Whether you’re visiting for tourism, business, or a short-term stay, this online service helps you handle immigration, customs, and tax-free shopping forms in advance. Here’s how to use it:
Must Read: Chandratal Lake in Spiti Valley: A Must‑Visit Guide 2025
Create an account
Getting started with Visit Japan Web is quick and free. Before your trip to Japan, creating an account is the first step toward skipping long lines at immigration and customs. Here’s how to do it:
🔹 Step-by-Step Guide to Create an Account
- Go to the Visit Japan Web Portal
Open your browser and search for “Visit Japan Web official site”. Be sure to click on the official Japanese government website for safety and accuracy. - Select Language
Once the site loads, choose your preferred language from the top-right corner. English, Japanese, Chinese, and Korean are available. - Click “Create an Account”
Look for a button that says “New Registration” or “Create Account.” Click it to begin. - Enter Your Email Address
Type in a valid email address you have access to. This email will be used for account verification and updates. - Set a Password
Create a secure password that meets the site’s requirements—usually a mix of letters, numbers, and symbols. - Agree to the Terms
Check the box to agree to the Terms of Use and Privacy Policy. - Confirm Email Verification
You’ll receive a confirmation email within minutes. Open the email and click the verification link to activate your account. - Log In and Start Using the Service
Once verified, return to the Visit Japan Web portal and log in with your new credentials. You can now start entering your trip details.
🔐 Tips for a Smooth Registration
- Use an email address you’ll have access to while traveling.
- Write down your password or save it in a password manager.
- If the verification email doesn’t show up, check your spam or junk folder.
Creating your Visit Japan Web account early saves you time at the airport and ensures a seamless arrival experience. It only takes a few minutes—and it’s worth it.
How to Register as a Tourist on Visit Japan Web
If you’re visiting Japan for leisure, sightseeing, or family visits, you’ll need to register as a tourist on the Visit Japan Web portal. This helps you breeze through immigration and customs by submitting everything in advance. Here’s a clear guide on how to do it:
🧳 Step-by-Step: Registering as a Tourist
✅ 1. Log In to Your Account
- Go to the Visit Japan Web portal.
- Enter your email and password to sign in.
✅ 2. Add a New Trip
- Click “+ Add Trip” or a similar option from your dashboard.
- Fill in your arrival airport, airline, and flight number.
- Select the purpose of visit: Choose “Tourism” or “Sightseeing” from the dropdown menu.
- Enter your arrival and departure dates.
✅ 3. Complete Immigration Info
- Go to the Immigration Information section.
- Fill in:
- Passport number
- Nationality
- Date of birth
- Address in Japan (hotel, Airbnb, or family residence)
- Emergency contact info
- Passport number
✅ 4. Register for Customs Declaration
- Head to the Customs section.
- Enter:
- Details about items you’re bringing (cash over ¥1 million, restricted items, etc.)
- Any goods for declaration
- Details about items you’re bringing (cash over ¥1 million, restricted items, etc.)
You’ll get a QR code once this is completed.
✅ 5. (Optional) Register for Tax-Free Shopping
- If you plan to shop in Japan and want to make tax-free purchases, register this section too.
- Provide your passport number and arrival details.
✅ 6. Save Your QR Codes
- After completing the forms, your dashboard will show two QR codes:
- One for immigration
- One for customs
- One for immigration
📱 Take screenshots or download them in case of a poor internet connection at the airport.
✈️ Final Step: Show QR Codes Upon Arrival
- At the airport, follow the signs for Visit Japan Web users.
- Show your QR codes to immigration and customs officers.
- No paper forms, no delays—just scan and go.
📝 Pro Tips:
- Fill out all forms at least 24–48 hours before your flight.
- Double-check for mistakes in passport number or travel dates.
- Register a separate trip for each visit, even if you’ve used the site before.
Registering as a tourist on Visit Japan Web is simple and cuts your time at the airport in half. Do it once, and you’ll wonder why it’s not standard everywhere.
How to Enter Registration User Information on Visit Japan Web
After creating an account on Visit Japan Web, the next step is entering your User Information—this is the essential personal data needed for immigration and customs processing. Filling it out correctly ensures a smooth entry into Japan with no surprises at the airport.
📋 Step-by-Step: Registering User Information
✅ 1. Log In to Visit Japan Web
- Use your registered email and password to log in.
- From the dashboard, go to “User Information” or a similar tab.
✅ 2. Enter Basic Personal Details
Fill out the following fields accurately:
- Full Name (exactly as shown on your passport)
- Date of Birth
- Gender
- Nationality
- Passport Number
- Passport Expiry Date
🛂 Make sure this info matches your passport perfectly to avoid issues at immigration.
✅ 3. Add Contact Information
- Email Address (automatically filled in from your account)
- Phone Number (preferably one you can use while in Japan)
- Emergency Contact Information (name, relationship, and phone number)
✅ 4. Save and Confirm
- Review all details to catch any typos or incorrect info.
- Click “Save” or “Register” once you’re done.
🔐 Your information is securely stored and used only for entry procedures.
📌 What Happens Next?
Once your User Information is saved:
- You can begin registering individual trip details.
- This data will autofill when you add immigration, customs, or tax-free shopping info—saving time.
📝 Pro Tips:
- Use Roman letters when entering names and addresses.
- If you have a middle name, include it exactly as printed on your passport.
- You can edit or update your User Information anytime before your flight.
Registering your User Information correctly on Visit Japan Web sets the foundation for a fast, paperless, and stress-free arrival. It’s quick, secure, and a must-do for every traveler heading to Japan.
How to Enroll Your Passport and Basic Information on the Visit Japan Web
Once you’ve created an account and logged in to Visit Japan Web, the next essential step is enrolling your passport and basic personal information. This allows the system to pre-fill your immigration and customs forms and generate your QR codes for arrival. Here’s how to do it right:
🛂 Step-by-Step: Enroll Your Passport and Basic Details
✅ 1. Log In to Visit Japan Web
- Use your registered email and password to access your dashboard.
- From the menu, go to “User Information” or “Traveler Information”.
✅ 2. Enter Passport Details
In the Passport Information section, fill out exactly as shown in your passport:
- Full Name (Surname and Given Name, no nicknames)
- Passport Number
- Country of Issue
- Nationality
- Date of Issue
- Expiry Date
📌 Important: Do not use abbreviations or special characters. Everything must match your passport precisely to avoid issues at immigration.
✅ 3. Fill in Basic Personal Information
Below the passport section, enter:
- Date of Birth
- Gender
- Place of Birth (City and Country)
- Contact Phone Number
- Email Address (if not auto-filled)
✅ 4. Upload a Passport Photo (If Requested)
Some versions of the form may allow or require a passport image upload. If prompted:
- Take a clear photo of the photo page of your passport
- Make sure all text is legible and corners are visible
- File format: JPEG or PNG; under the max size limit specified
✅ 5. Save and Confirm
- Double-check all fields for typos or errors
- Click “Save”, “Register”, or “Confirm” depending on what the button says
You can always go back and edit this information later—just make sure everything is finalized before your flight.
🧠 Pro Tips:
- If you’re traveling with family, repeat the process for each traveler, including children.
- Always recheck your passport number—one wrong digit can delay your entry.
- Use Roman letters only (no kanji, accents, or symbols).
Enrolling your passport and basic information is one of the most crucial steps in using Visit Japan Web. Do it carefully, and you’ll glide through immigration like a pro.
Registering Additional Information & Confirmation on the Visit Japan Web
After entering your passport and basic personal details, the final step before generating your QR codes is registering additional information and confirming everything. This section ensures Japanese immigration and customs officials have everything they need to approve your entry quickly and efficiently.
🔍 Step-by-Step: Add Extra Details and Confirm
✅ 1. Log in and Go to Your Trip
- From your Visit Japan Web dashboard, select the trip you already added or create a new one.
- You’ll be taken to a screen that shows your trip details, immigration, and customs sections.
✅ 2. Complete Immigration Information
Fill in the following details carefully:
- Purpose of Visit (Choose: Tourism, Business, Visiting relatives, etc.)
- Intended length of stay
- Place of Stay in Japan: Name and address of your hotel, Airbnb, or family home
- Flight number and arrival airport
- Emergency contact (can be someone in Japan or your home country)
✅ 3. Complete Customs Declaration
Click on Customs Declaration and fill in:
- Whether you’re carrying items like large amounts of cash, restricted goods, or personal belongings over the duty-free limit
- If you’re bringing food, alcohol, or tobacco, declare them honestly
Once done, the system will prepare a customs QR code based on your input.
✅ 4. Optional: Register for Tax-Free Shopping
If you want to shop tax-free while in Japan, complete the tax-free section by:
- Confirming your passport number
- Checking the box for tax-free eligibility
This helps shops confirm your status and speeds up in-store purchases.
✅ 5. Review & Confirm All Information
Before you can proceed:
- Review every section: Trip Info, Immigration, Customs, and User Information
- Look for errors—especially in passport number, flight info, and address in Japan
Once everything looks correct, click “Confirm” or “Finalize Registration”.
✅ 6. Download or Screenshot QR Codes
After confirmation:
- The system generates QR codes for both immigration and customs
- Save them on your phone and/or take a screenshot
📲 You’ll need to show these codes on arrival in Japan to skip filling out paper forms.
🧳 Final Tips:
- Make sure all sections are marked “Completed” on your dashboard
- If anything is left as “Incomplete”, immigration may not accept your pre-registration
- Changes can be made before your arrival, but finalize everything at least 24 hours before your flight
By registering your additional information and confirming your entries, you’re making your arrival in Japan faster, smoother, and completely digital. It’s a small task now that saves you a big headache later.
VISA Check and Family Records on Visit Japan Web
Once you’ve entered your personal and trip information, checking your visa status and adding family member records is an important final step—especially if you’re traveling with dependents or on a visa that requires verification.
Here’s how to complete both parts correctly:
🛂 1. VISA Check (for Visa Holders Only)
If you’re not from a visa-exempt country, you’ll need to verify your visa status on the Visit Japan Web.
✅ How to Do It:
- Go to your trip information section.
- Under Immigration, you may see a field or prompt to enter visa details.
- Fill in:
- Type of visa (e.g., Work, Student, Family, Spouse, Long-term)
- Visa number/reference number (from the sticker or document issued)
- Date of issue and expiry date
- Type of visa (e.g., Work, Student, Family, Spouse, Long-term)
✅ Note: For short-term visitors from visa-exempt countries (like the U.S., Canada, EU countries, etc.), no visa check is required—just select “Tourism” as your purpose of visit
👨👩👧👦 2. Registering Family Records (For Group or Family Travel)
If you’re traveling with family members, especially children or dependents, you can register everyone under one primary account to simplify arrival procedures.
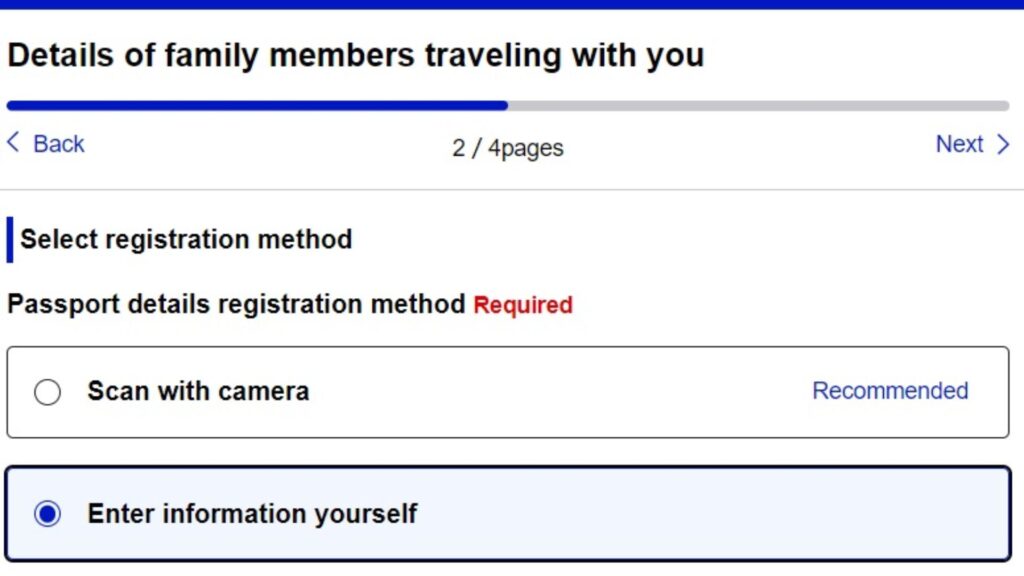
✅ How to Add Family Members:
- On your dashboard, look for an option like “Register Family Member” or “Add Accompanying Traveler”.
- For each person, enter:
- Full name (as in passport)
- Date of birth
- Nationality
- Passport number and expiry date
- Relationship to you (spouse, child, parent, etc.)
- Full name (as in passport)
Each member will be listed under your trip, and you’ll receive separate QR codes for each person.
📌 Important Reminders:
- Even infants and children must be registered if they are traveling with you.
- If any family member has a different visa type, enter it under their profile.
- All QR codes can be accessed under the main account.
✅ Final Step: Review & Confirm
Before your flight:
- Make sure every family member’s information is complete
- Confirm visa details, if applicable
- Download or screenshot each person’s QR codes
✈️ Why This Matters:
Registering visa details and family members ensures a smooth arrival for your whole group. It also helps immigration officers verify eligibility quickly, which speeds up entry and avoids delays—especially if you’re traveling with kids or elderly family.
Keeping these details accurate means everyone starts their Japan trip stress-free—with no surprise paperwork at the airport.
Register Entry/Return Schedule
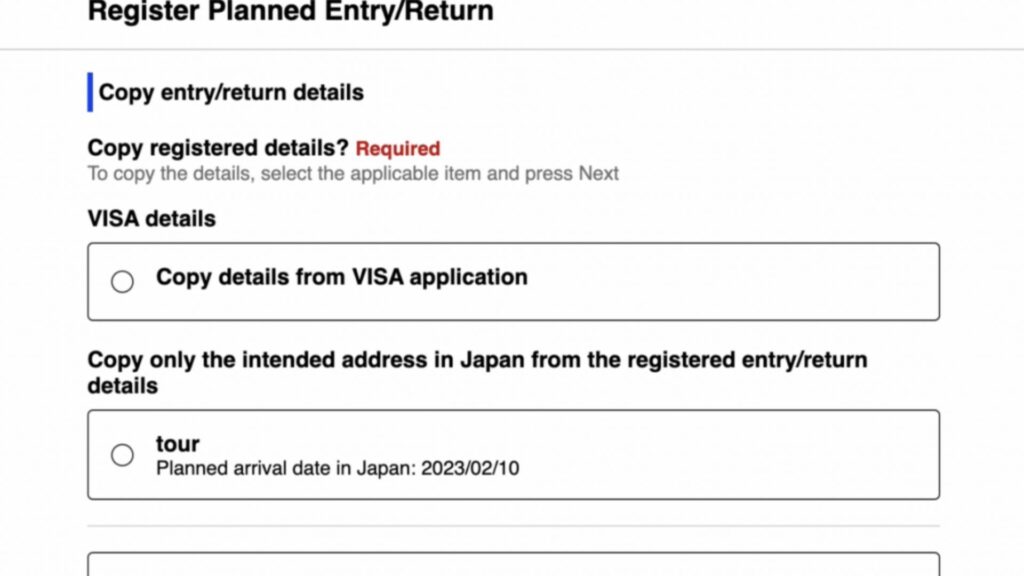
Ready to breeze through Japan’s entry process? Start by registering your entry and return schedule on the Visit Japan Web. This step lets immigration officials know exactly when you’ll arrive and depart, helping them manage passenger flow efficiently.
By submitting your travel dates early, you avoid last-minute hassles and speed up your airport procedures. Plus, it’s a crucial part of Japan’s updated system designed to keep travelers safe and organized in 2025. Don’t skip this—think of it as your first ticket to a smooth, stress-free trip.
Enter Contact and Stay Information in the Visit Japan Web
Once you’ve registered your schedule, it’s time to enter contact and stay information in the Visit Japan Web portal. This step requires you to provide detailed addresses for your accommodations—whether hotels, guesthouses, or private residences—and your phone number or email for easy communication.
Filling out this info accurately helps Japanese authorities keep track of visitors and respond quickly if health or safety issues arise. In 2025, this updated system aims to speed up arrivals while enhancing security, so don’t overlook this crucial task. Completing it early means less stress and a smoother journey through customs and quarantine.
Confirmation of Health and Customs Declaration Registration
The next essential step is the confirmation of health and customs declaration registration on the Visit Japan Web. This process involves submitting your health information—such as recent symptoms or vaccination records—and completing the customs declaration form digitally before arrival.
Once submitted, you’ll receive a confirmation screen and a QR code that streamlines your entry at the airport. As of 2025, this online system replaces paper forms, reducing wait times and physical contact. Make sure everything is filled out accurately and confirmed before your flight. It’s your fast-pass through quarantine, immigration, and customs checkpoints in Japan.
Must Read: The 10 Safest Countries in Africa (2025)
Entry Process: Immigration, Quarantine, and Customs
When you arrive in Japan, the entry process—immigration, quarantine, and customs—is smoother than ever thanks to the Visit Japan Web system. After landing, you’ll present your QR codes generated during your online registration. These codes speed up your passage through immigration, where officers verify your visa and entry details.
If applicable, quarantine checks are next—though in 2025, most health restrictions have eased, so this step is usually quick. Finally, you’ll breeze through customs, where your pre-submitted declaration helps avoid paperwork delays. By completing everything online in advance, you avoid long lines and get to start your Japan adventure faster.
Create and display a QR code

After submitting your travel, contact, and health details, the Visit Japan Web automatically creates and displays a QR code for each part of the entry process—immigration, customs, and quarantine. This QR code acts as your digital fast-pass at the airport. Just show it on your phone or print it out, and you’ll move quickly through checkpoints without filling out paper forms.
In 2025, this system will be fully integrated across all major Japanese airports, saving travelers time and reducing contact points. Keep your QR codes handy—you’ll need them more than once during arrival. It’s your key to a faster, safer, and more efficient entry into Japan.
Signing Up for Tax-Free Buying

If you’re planning to shop in Japan, signing up for tax-free buying through the Visit Japan Web is a smart move. This feature allows foreign travelers to skip the 10% consumption tax on eligible purchases like electronics, cosmetics, souvenirs, and fashion items.
Instead of filling out forms at each store, you can register your passport information and travel details online before your trip. Once done, participating retailers can verify your status instantly—just present your passport at checkout. As of 2025, this digital process is widely accepted across Japan, making it easier and faster to enjoy tax-free shopping without the hassle of paperwork.
Is Visit Japan Web worth it?
Pros:
Time-saver at airports. By completing immigration, customs, and health declarations ahead of time, you can skip long lines and paperwork, speeding up the entry process.
Convenience. You can enter your passport details, accommodation, and contact info online before your trip. Plus, the system generates a QR code you’ll need upon arrival.
Reduced physical contact. With most documents submitted digitally, there’s less need for paper forms or shared materials at the airport.
Unified codes. As of 2024, Japan combined the immigration and customs QR codes, making things easier for travelers.
Official and reliable. Since it’s operated by the Japanese government, the platform is frequently updated, multilingual, and generally stable.
Cons:
Not mandatory. You can still enter Japan using paper forms, but you’ll likely face longer lines.
Technical glitches. Some users report issues with uploading passport photos, generating QR codes, or problems on certain browsers.
Inconsistent benefits. Depending on the airport and arrival time, the “fast lanes” may still be crowded, offering little time savings.
Tax-free QR is not accepted everywhere. Some stores still require your physical passport for tax-free purchases, despite online registration.
Interface issues. While there is multilingual support, some translations or prompts can be confusing. Mobile and desktop experiences can vary.
Video instructions for the use of services
FAQs
Why does the Visit Japan Web exist?
Offered by the Digital Agency, Government of Japan, Visit Japan Web is an internet site allowing visitors to finish health, customs, and immigration declarations before landing in Japan.
Should I register on the Visit Japan Web before going on my trip to Japan?
Advance registration is highly recommended to speed up arrival processes and clear the way to customs and immigration posts.
Am I able to enroll my family members under one Visit Japan Web account?
Yes, you may sign up your family members to your account along with their health and trip information for quicker processing upon arrival.
What papers do I need to finish the registration?
You will require your passport, flight information, lodging information, and any pertinent health or customs statements.
Do I have to fill out paper forms at the airport if I use Visit Japan Web?
Not if you do all the steps online, because you will just show the QR codes at immigration, customs, and health checkpoints, and paper forms are required.
Conclusion
In so many words, Visit Japan Web is a great feature for anyone planning a trip to that country because it will simplify the process of entry, avoid long lines, ensure preparation before arrival, and so on. Moreover, online registration of travel, health, and customs information saves time and makes you less stressed when you reach the airport.
Whether coming for tourism or business, visiting Japan with Visit Japan Web gives a smoother, faster entry experience to the country. Keep yourself updated and travel smart with it; best of all, ensure that your journey becomes easier with this professional Japanese government platform.

Travels skyways helps you plan your perfect journey with expert tips, destination guides, travel hacks, and budget advice. Whether it’s a quick getaway or a dream vacation, we’re here to guide your adventure from start to finish.